
The single simplest way to tell if an Adelaide venue will photograph well is whether it provides soft, directional natural light in the ceremony or getting-ready rooms. If large windows or open architecture let that light in without harsh overhead glare, you’re in good shape with minimal extra work. If the space is dim or lit by mismatched globes, it can still produce a beautiful gallery, but you and your photographer will need a plan. Adelaideweddingvenues recommends visiting any shortlisted venue at your actual ceremony time before you sign anything.
TL;DR:
- Visiting venues at the same time of day as the wedding ceremony, preferably during the actual season, provides the most accurate idea of lighting conditions.
- Large windows, glasshouses, and open shade areas create the most flattering, soft natural light for photography, while dim or mismatched artificial lighting can complicate results.
- Effective venues typically offer at least two distinct lighting environments, including indoor and open-sky spaces, to maximize photo variety.
- Planning the wedding timeline around golden hour, usually between 4:30 pm and 6:30 pm, significantly enhances portrait quality and final album coherence.
- For dim venues, using bounce flash, stepping outside for shade portraits, or briefing photographers on mood-specific shooting can yield excellent images despite low light.
What good venue lighting for photos actually looks like
Photographers talk about “soft light” constantly, and it comes down to one simple idea: the bigger the light source relative to the person standing in it, the softer and more flattering the shadows on their face. A wall of north-facing windows or a glasshouse ceiling acts like a giant natural softbox. A single pendant light does not. Large, soft natural light sources like big windows, glasshouses, and orangeries produce flattering skin tones and even colour that artificial light struggles to match, which is why photographers so often steer couples toward rooms with generous glazing.
Architecture does a lot of the heavy lifting here. High ceilings, light-coloured walls, and a mix of open and intimate spaces give a photographer somewhere to work when the light shifts through the day. High ceilings let flash bounce back down as soft, diffuse light, while low ceilings absorb it and flatten the image with more visible grain. Adelaide’s glasshouse-style function rooms, converted heritage halls with tall windows, and open-air courtyards tend to tick these boxes without much intervention.
Three things trip venues up on a walkthrough, as explained in How venue choice shapes your event photo ops:
- Small, recessed downlights that create harsh shadows under eyes and noses.
- Mixed colour sources, such as daylight streaming in alongside warm tungsten or fairy lights, which introduce colour casts that complicate colour balance across a gallery.
- Low, dark ceilings that swallow bounce flash and leave reception photos looking flat.
None of these are dealbreakers on their own, but they compound quickly in a room that already lacks natural light.
Pro Tip: Stand where the couple will stand during the ceremony and look up. If you can see patches of sky-bright window or open roof directly above or beside that spot, the room is doing at least half the work for your photographer already.
How to assess venue lighting on a tour: a step-by-step checklist
A venue tour booked for 11 am tells you nothing about how the room looks at 4 pm in autumn. Visiting at the same time as your planned ceremony shows you exactly how light behaves in that space, and it’s the single most useful thing you can do before booking.
- Book the tour at ceremony time. If your ceremony is at 3:30 pm in April, tour at 3:30 pm in April, or as close as the venue allows.
- Stand in the exact ceremony spot and photograph it on your phone, facing the direction the celebrant and couple will face.
- Check the getting-ready room for window placement and enough clear floor space for a photographer to back up and shoot portraits.
- Look up at the reception ceiling. Note the height and the surface. White plaster bounces flash well; dark timber or exposed brick absorbs it.
- Identify two portrait locations, one in open sun and one in shade, and check both have some sky access rather than being boxed in by walls or awnings.
- Photograph and film everything. Photographer guides consistently recommend shooting quick phone photos and short videos during a walkthrough so you can review the light later and send it straight to your photographer for feedback.
A venue with genuinely good light will usually offer at least two distinct lighting environments across the day, an indoor space for getting ready and ceremony, plus an open-sky spot for golden hour portraits. That variety is what gives a wedding album its range, rather than every photo looking like it was shot in the same three metres of floor space.
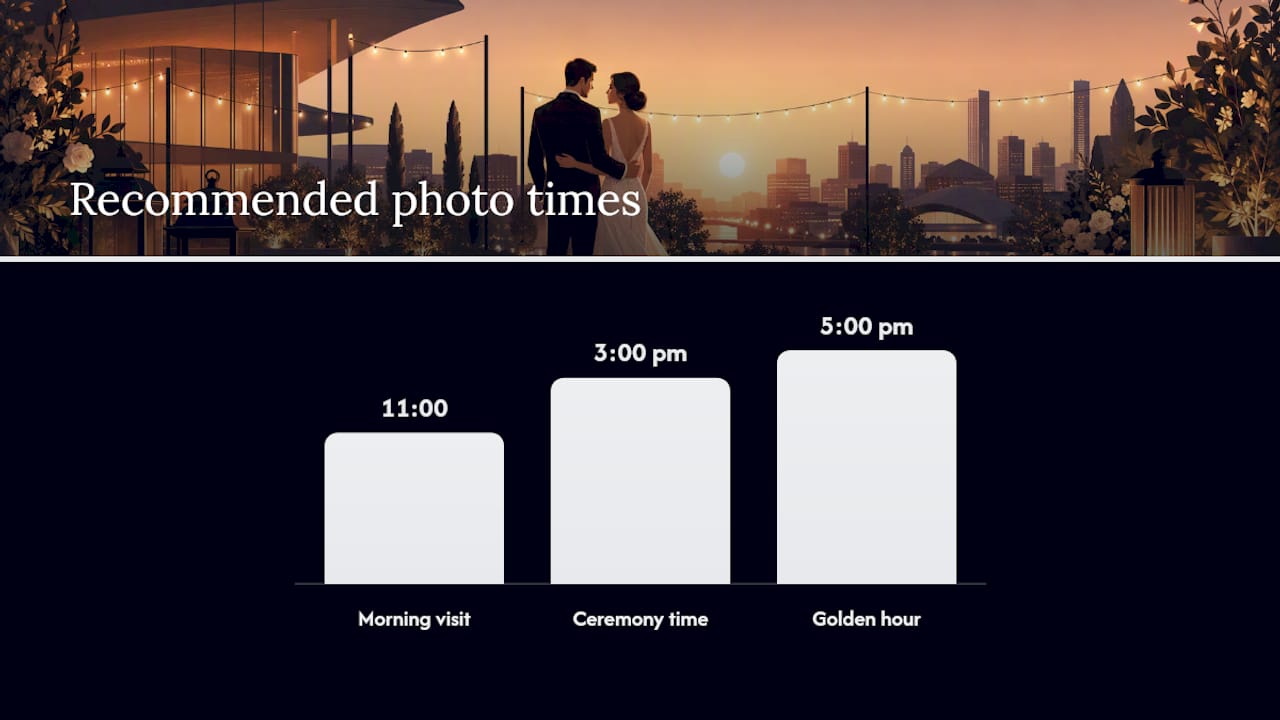
Pro Tip: Take the same phone shot at three different times if the venue allows a second visit. Comparing 11 am, 3 pm and 5 pm photos side by side shows you more about a room’s light than any brochure ever will.
Questions to ask the venue and your photographer
Some questions get you further with the venue coordinator, others belong with your photographer. Knowing which is which saves you a round of follow-up emails.
Ask the venue:
- Where are the brightest windows in the ceremony and reception spaces, and which way do they face?
- Can we access outdoor portrait spots quickly at golden hour, or is there a walk involved?
- Are there any photography restrictions, blackout curtains, or times the blinds are drawn?
- What’s the actual ceiling height in the reception room?
Ask your photographer:
- Have you shot at this venue before, and if so, where did the light work best?
- Where do you usually take sunset portraits on this property?
- What’s your wet-weather backup plan here specifically, not generically?
Useful follow-ups for both:
- Can we tour again at our exact ceremony time closer to the date?
- Could a small portrait area be cleared or reserved for twenty minutes at sunset?
- Is staff on hand to open gates, courtyards, or access points quickly if we need them during the shoot?
Timeline and golden hour planning for Adelaide weddings
Golden hour in Adelaide shifts with the seasons, but late afternoon, roughly between 4:30 pm and 6:30 pm depending on the time of year, is usually prime for the dreamy, warm-toned portraits couples picture when they imagine their gallery. Building your day around that window, rather than squeezing portraits in wherever there’s a gap, makes a measurable difference to the final set of images.
A simple structure that works for most Adelaide weddings:
- Getting ready in a room with strong morning or midday light, ideally east-facing so the light is soft rather than harsh.
- Ceremony scheduled with enough runway to reach portraits before the light drops too far.
- A 20 to 30 minute buffer built in specifically for travel between ceremony and portrait location.
- Sunset portraits scheduled at a west-facing or open spot 30 to 45 minutes before actual sunset.
- Reception photos planned around whatever ambient lighting the room offers once the sun is gone.
East-facing rooms suit morning preparation because the light is gentler and less likely to blow out camera sensors. West-facing courtyards or lawns come into their own for portraits later in the day. None of this works without clear communication, so confirm your shot list timing with both the photographer and the venue coordinator at least a fortnight out, not on the morning itself.
When a venue is dark: practical fixes that keep photos flattering
A dim reception room doesn’t rule a venue out. It just changes the plan.
Photographers have a handful of reliable techniques for these rooms: bouncing flash off a high, light ceiling instead of firing it straight at guests, stepping outside for open shade portraits rather than relying on indoor ambient light, and using reflectors or warm-toned continuous lights to fill in shadow on the couple’s faces.
On the venue side, a few small requests go a long way:
- Ask whether dimmers can be turned up rather than down for photo hour.
- Request warmer, consistent bulbs rather than a mix of daylight and tungsten globes.
- See if heavy drapes or clutter near the ceremony spot can be cleared.
- Confirm there’s one clean indoor corner set aside as a backup portrait spot.
Sometimes the honest answer is to lean into the mood rather than fight it. A dim, candlelit reception can photograph beautifully if you brief your photographer to shoot for that atmosphere from the outset, rather than expecting bright, airy images from a room that was never going to deliver them.
Pro Tip: If a venue can only offer moody indoor light, ask your photographer to plan one bright portrait set outdoors earlier in the day. That single sunlit sequence often becomes the backbone of the whole gallery.
A publisher’s note on choosing venues by light
Adelaideweddingvenues is maintained with direct input from working Adelaide photographers, which shapes how listings get written up in the first place. It’s the reason the directory flags photo-friendly features and photography restrictions on individual venue pages, rather than leaving couples to guess from a handful of styled shots.
Use the checklist above on your next tour, save the venues that pass it, and send those phone photos straight to your photographer before you commit to anything.
— Steven
Compare venues by lighting notes with Adelaideweddingvenues
Scrolling through dozens of Instagram-perfect venue photos tells you nothing about how a room actually lights a bride at 4 pm in July. Adelaideweddingvenues solves that specific problem: its directory lets you filter South Australian venues by type and features, then cross-check each shortlisted option against curated lists built specifically around light and photography, rather than generic styling.
Start with the top Adelaide venues for sunset photography if golden hour portraits matter most to you, or browse the broader directory if you’re still working out what style of venue suits your day. Many listings carry photo notes and restriction details straight from venue operators, so you can rule rooms in or out before you spend a Saturday touring them. Once you’ve built a shortlist, save your favourites and book tours at your actual ceremony time. If you want a broader framework for weighing lighting against budget, capacity, and style, the guide on choosing your ideal wedding venue walks through the trade-offs couples usually face next.
Sources
- How to Choose a Wedding Venue for the Best Photography — Emily Young Weddings
- How Your Wedding Venue Choice Affects Your Wedding Photography — Lewis Bishop Photography
- 8 Tips on How to Choose a Wedding Venue That Will Photograph Beautifully — Courtney Bowlden Photography
- Adelaide wedding timeline advice — Amy Allen Creative Co
FAQ
What is the best type of natural light for wedding photos?
Large, soft, diffused light from big windows, glasshouses, or open shade is the most flattering because it wraps evenly around a face without harsh shadows.
When should I tour a venue to check the lighting?
Tour at the same time of day as your planned ceremony, ideally in the same season, so you see exactly how the light will fall on the day.
What time is golden hour for weddings in Adelaide?
Golden hour typically falls between roughly 4:30 pm and 6:30 pm depending on the season, making it the preferred window for warm, glowing portrait light.
Can a dark venue still produce good wedding photos?
Yes. Bounce flash off light-coloured high ceilings, step outside for open shade portraits, or brief your photographer to shoot for a moodier aesthetic from the start.
How do I check if a venue’s lighting suits photography before booking?
Use Adelaideweddingvenues to check photo notes and restrictions on venue listings, then confirm with an in-person tour booked at your ceremony time.
